Image Formation by Convex Lens: All 6 Cases with Diagrams
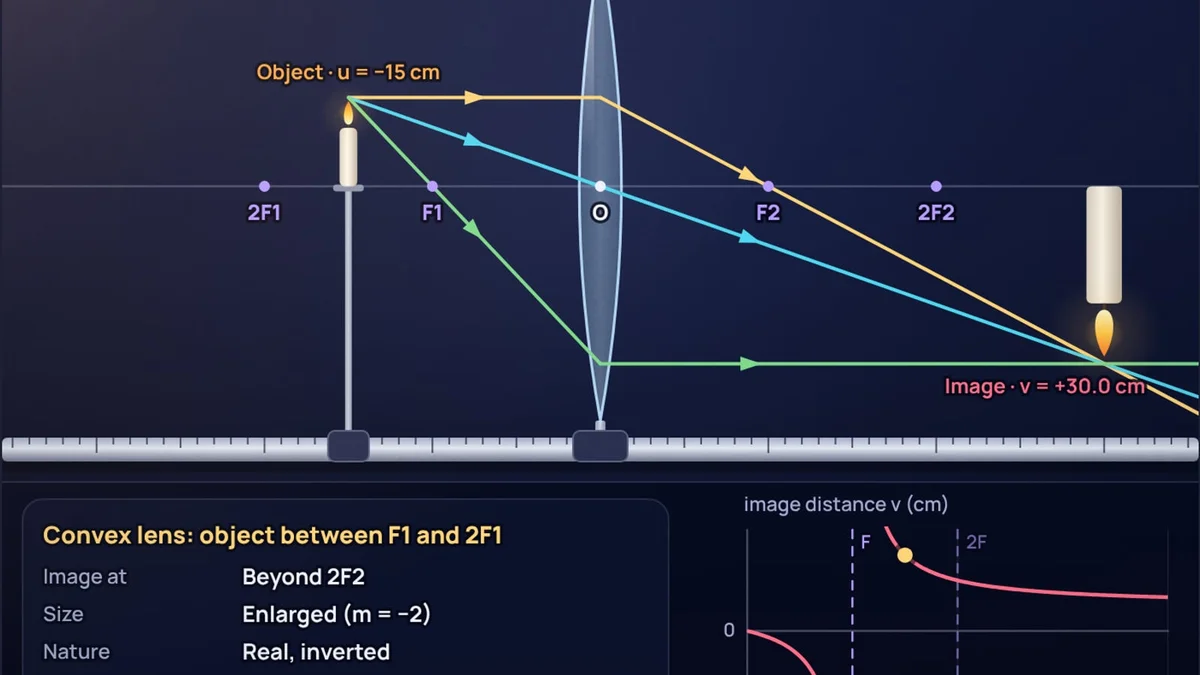
Hold a magnifying glass over a page and the letters grow. Hold it at arm's length toward a window and a tiny upside-down picture of the window appears on the page instead. Same lens, same light. The only thing you changed is how far the object is from the lens compared with one number, the focal length. That single comparison decides everything on the NCERT table of image formation by a convex lens, and it is easier to see than to memorise. You can drag the object yourself in our lens ray diagram simulator, which redraws the three rays and computes the image for every position.
What do F1, F2, 2F1 and 2F2 mean on a ray diagram?
A convex lens has a focus on each side. Parallel light coming from the left converges at F2 on the right; light from the right converges at F1 on the left. Both sit one focal length f from the optical centre O. The points 2F1 and 2F2 are twice as far. For a lens of focal length 10 cm, F1 is 10 cm to the left, 2F1 is 20 cm to the left, and F2 and 2F2 are the same distances to the right.
Everything below uses that 10 cm lens and a candle 2 cm tall, the same setup as the simulator's default. The numbers come from the lens formula with the New Cartesian sign convention used in NCERT Class 10: distances measured from O, positive in the direction the light travels, so the object distance u is negative and a convex lens has positive f.
Which three rays do you draw?
Each ray starts at the top of the object. Two are enough to find the image; the third is a check that catches drawing mistakes.
- Parallel ray. Drawn parallel to the principal axis, it bends at the lens and passes through F2.
- Central ray. Drawn through the optical centre O, it passes straight through without bending.
- Focal ray. Drawn through F1 (or as if coming from F1), it leaves the lens parallel to the axis.
Where the rays cross, the tip of the image sits. If they spread apart after the lens and never cross, trace them backwards with dashed lines: where the dashed lines meet is a virtual image. That is the whole method. The six cases are the same three rays drawn with the candle in six places.
Case 1 and 2: object at infinity and beyond 2F1
Light from a very distant object, such as the Sun or a far-off tree, arrives as a bundle of parallel rays. A convex lens brings them to a point in its focal plane, so the image sits at F2 and is "highly diminished, point-sized" in NCERT's words. This is the burning-glass trick: all the sunlight hitting the lens squeezed into a dot.
Bring the object in to 30 cm, three focal lengths away. Now the image is a real, scaled-down copy.
Worked example: object at 30 cm from a 10 cm lens
Positive v: a real image on the far side, 15 cm from the lens, between F2 (10 cm) and 2F2 (20 cm). Negative m: inverted. Half the size.
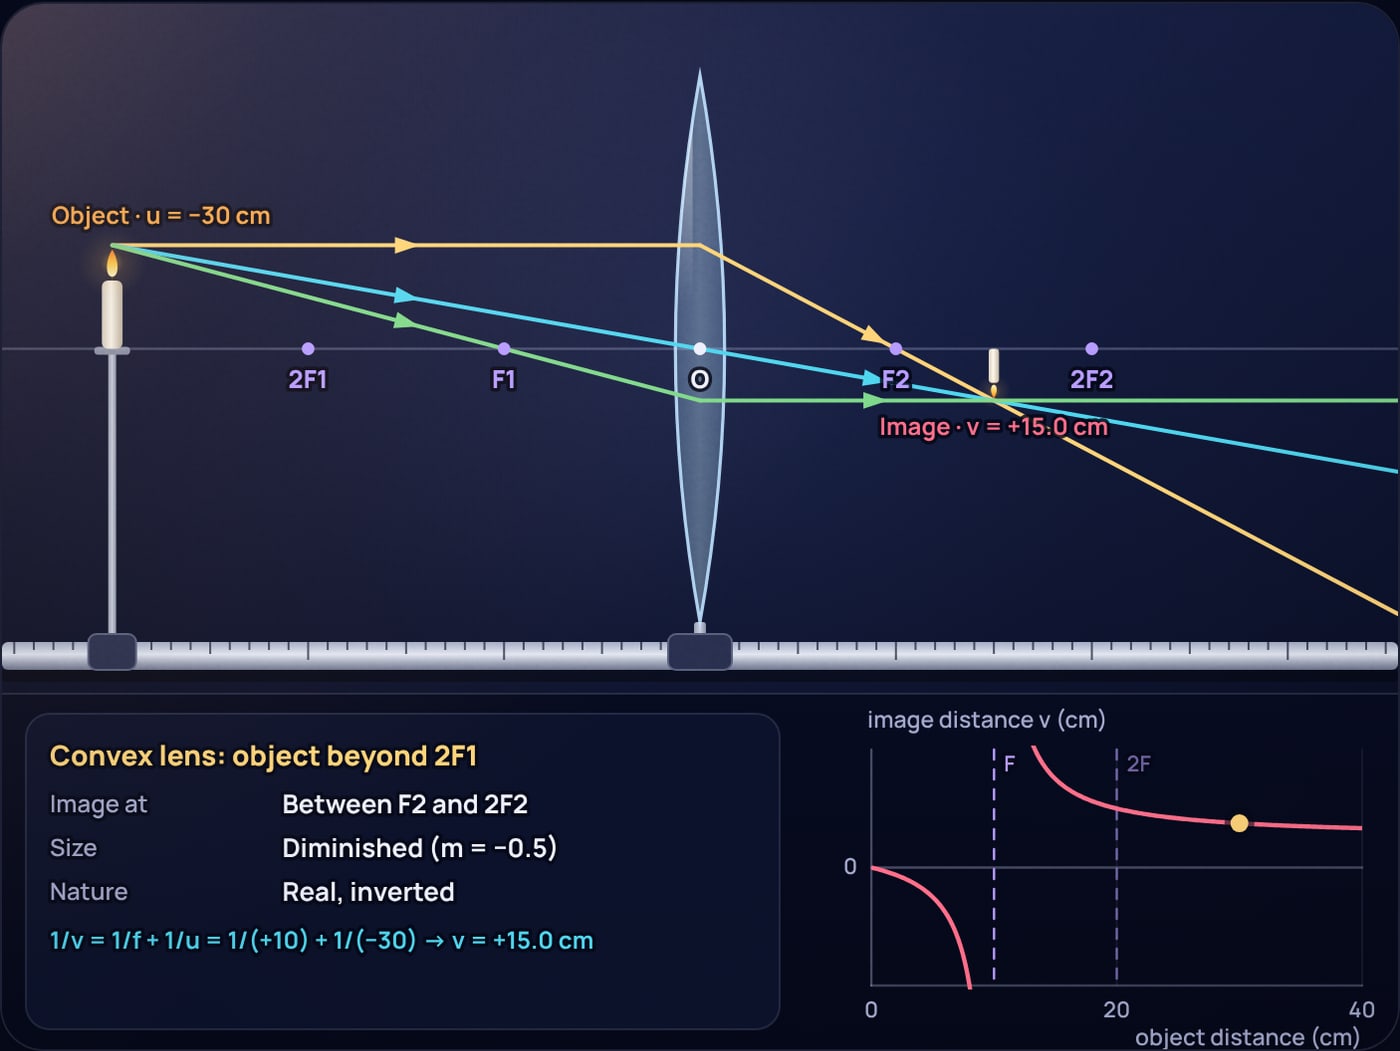
This is the camera case, and the eye case. Together, your cornea and eye lens have a power of about 60 dioptres, an effective focal length near 1.7 cm, and everything you look at is far beyond 2F, so the image on your retina is small, real and upside down. The brain does the flipping.
Case 3: object at 2F1
At u = −20 cm the arithmetic is neat: 1/v = 1/10 − 1/20 = 1/20, so v = +20 cm and m = 20 / (−20) = −1. The image sits at 2F2, upside down and exactly the size of the object. The ray diagram is symmetric about the lens, which makes it the easiest one to check by eye.
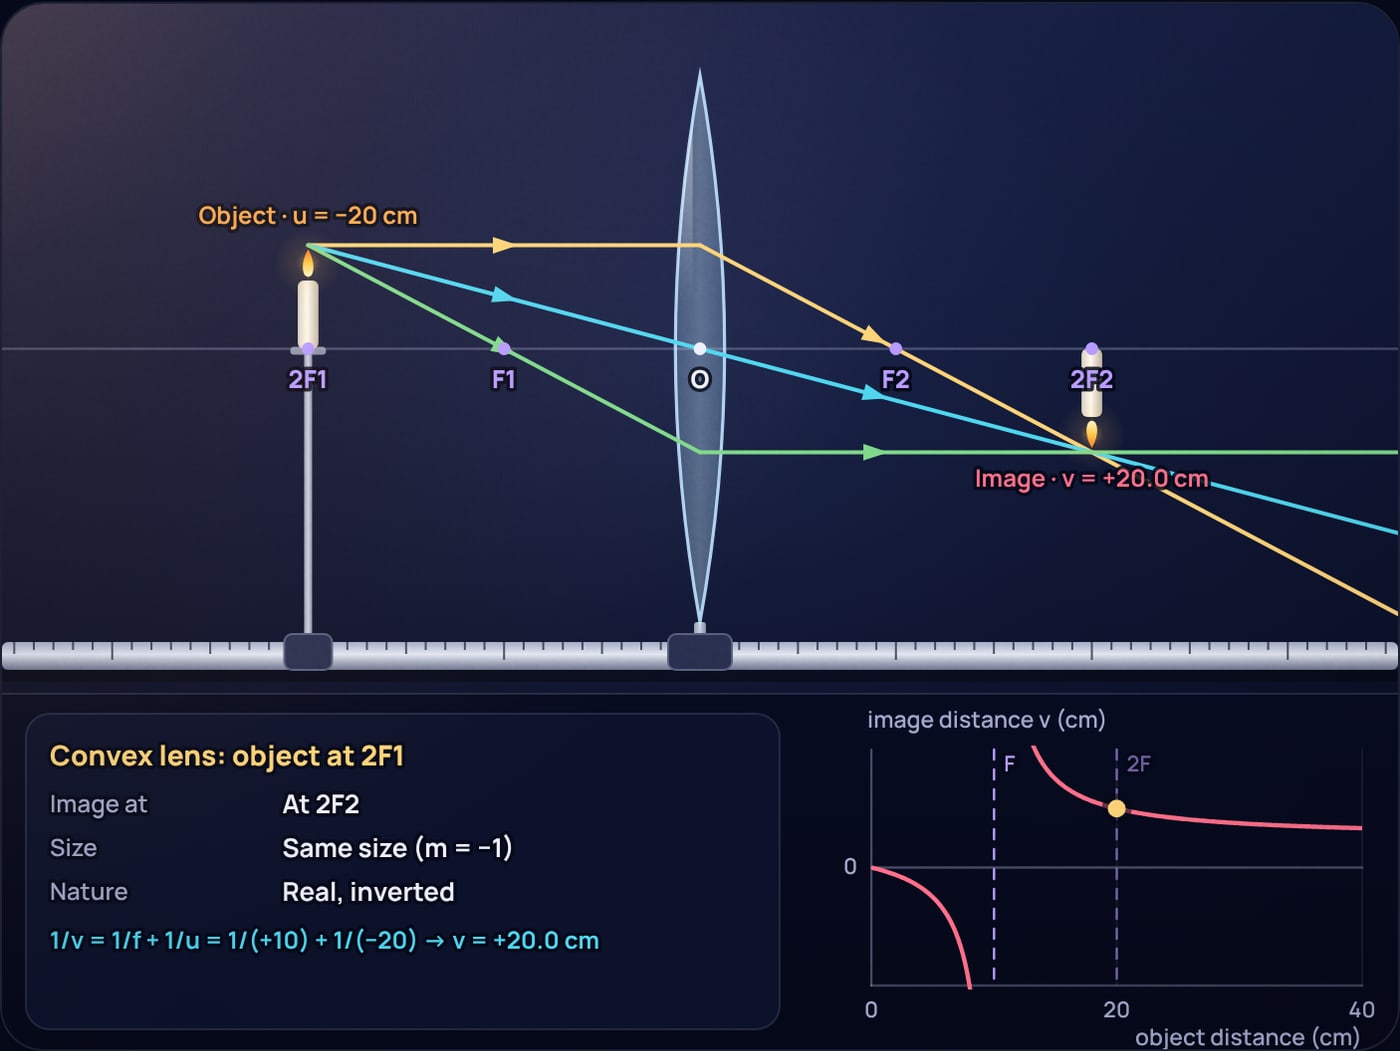
There is a neat fact hiding here. The distance from object to real image, |u| + v, is smallest when the object is at 2F, and that minimum is 4f. For our lens, 40 cm. Try any other position in the simulator and the candle and its image end up farther apart. If a lab question asks you to find f quickly, slide the lens and screen until the image is the same size as the object, then divide the object to screen distance by 4.
Case 4: object between F1 and 2F1 (the NCERT worked example)
This is the position NCERT uses in its worked example: a 2.0 cm object, 15 cm from a convex lens of focal length 10 cm.
Worked example: object at 15 cm from a 10 cm lens
A real, inverted image 30 cm behind the lens, beyond 2F2, twice as tall as the object.
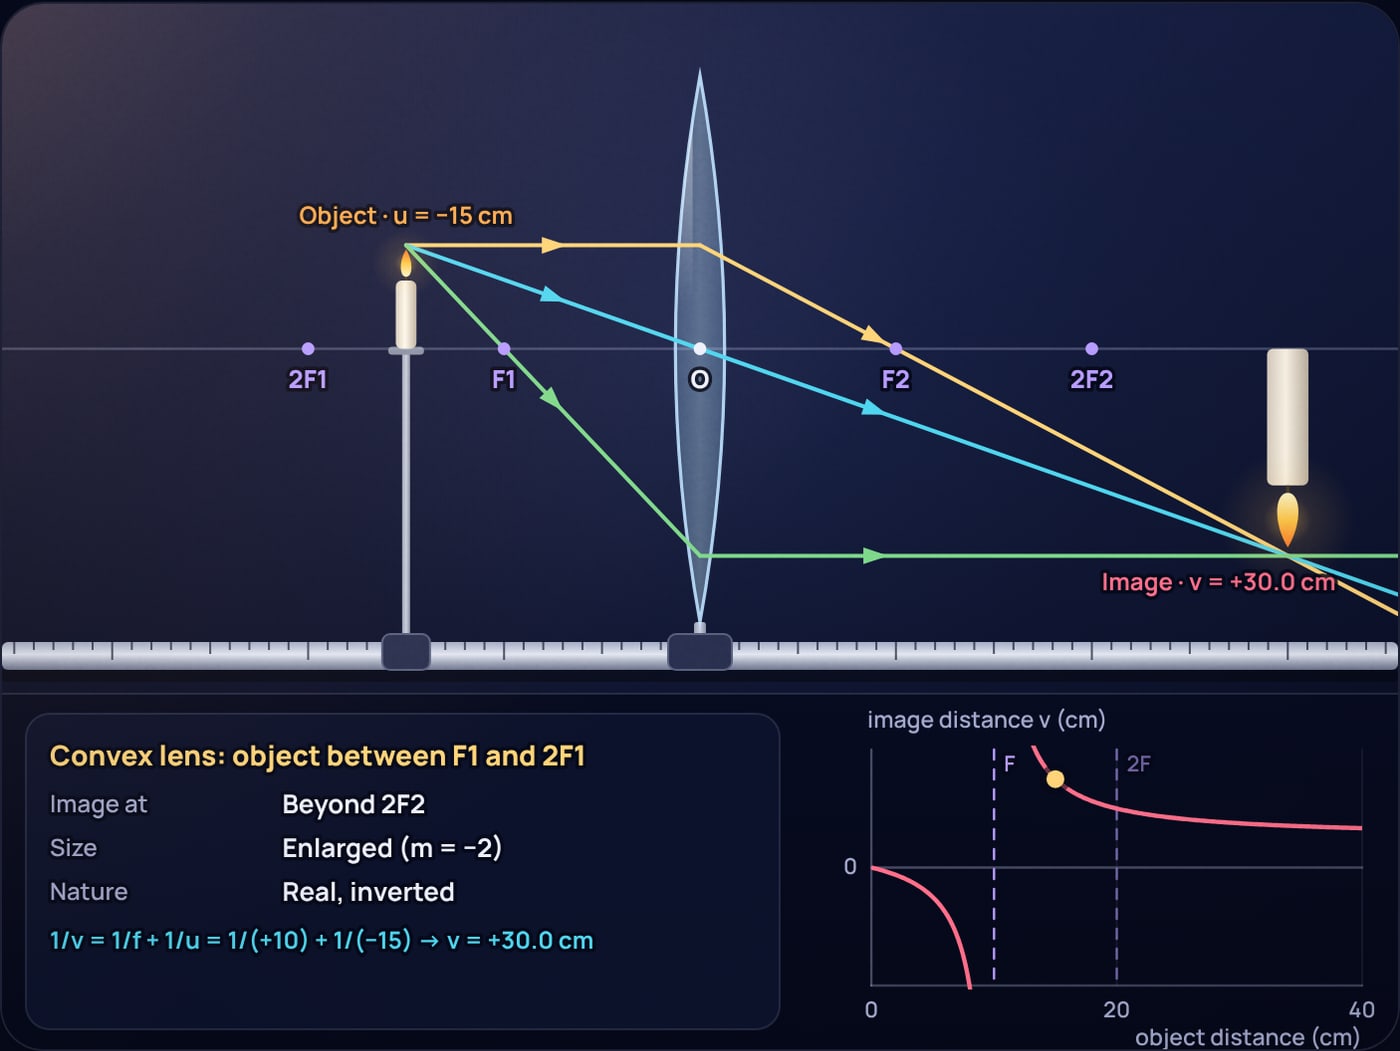
A projector works this way: a small, brightly lit slide sits just outside the focal length of the projection lens, and a big real image lands on a far wall. The slide is loaded upside down so the picture comes out the right way up. Notice how fast the image runs away as the object approaches F1: at 12 cm the formula gives v = +60 cm and m = −5.
Case 5: object at F1
Put the candle exactly at u = −10 cm. Then 1/v = 1/10 − 1/10 = 0, and v is infinite. In the diagram the refracted rays come out parallel and never meet. NCERT describes the image as "at infinity, infinitely large or highly enlarged". The focal ray is missing in this case, because a line from the object top through F1 runs vertically and never reaches the lens.
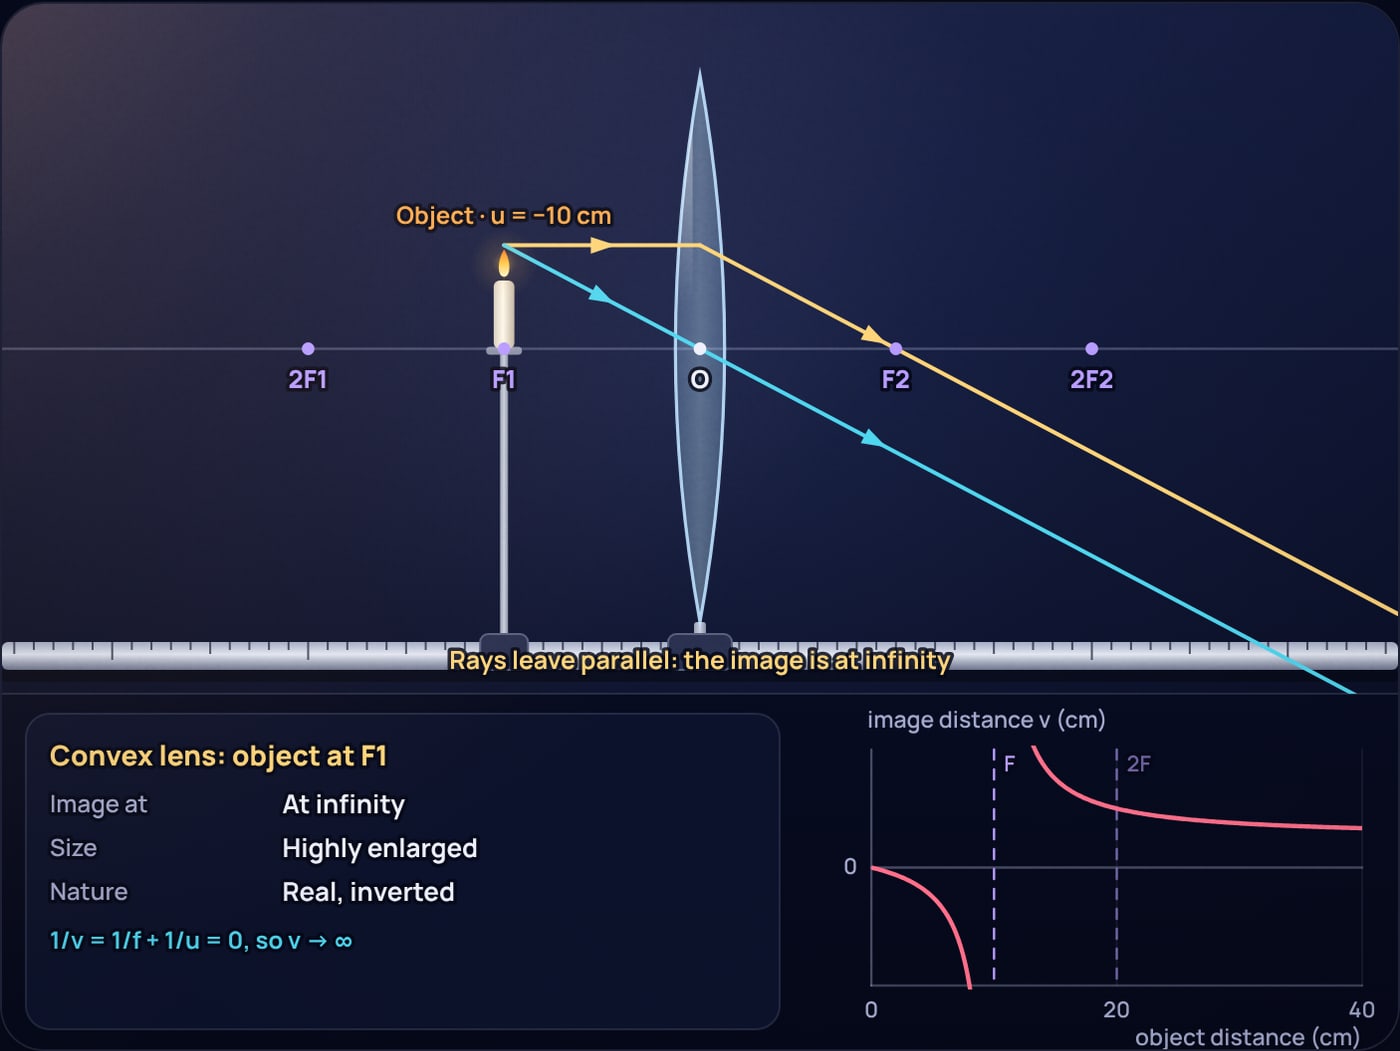
Reverse it and you have a torch or a searchlight: a small lamp at the focus produces a parallel beam that does not spread much. Case 1 and case 5 are the same path of light run in opposite directions, which is a good way to remember both.
Case 6: object between F1 and O (the magnifying glass)
Inside the focal length, the lens no longer has enough bending power to bring the rays together. They leave it still spreading. Your eye on the far side does not care: it traces them back and sees an upright, larger candle standing behind the real one.
Worked example: object at 5 cm from a 10 cm lens
Negative v: the image is on the object's side of the lens, so it is virtual. Positive m: erect. Twice the size.
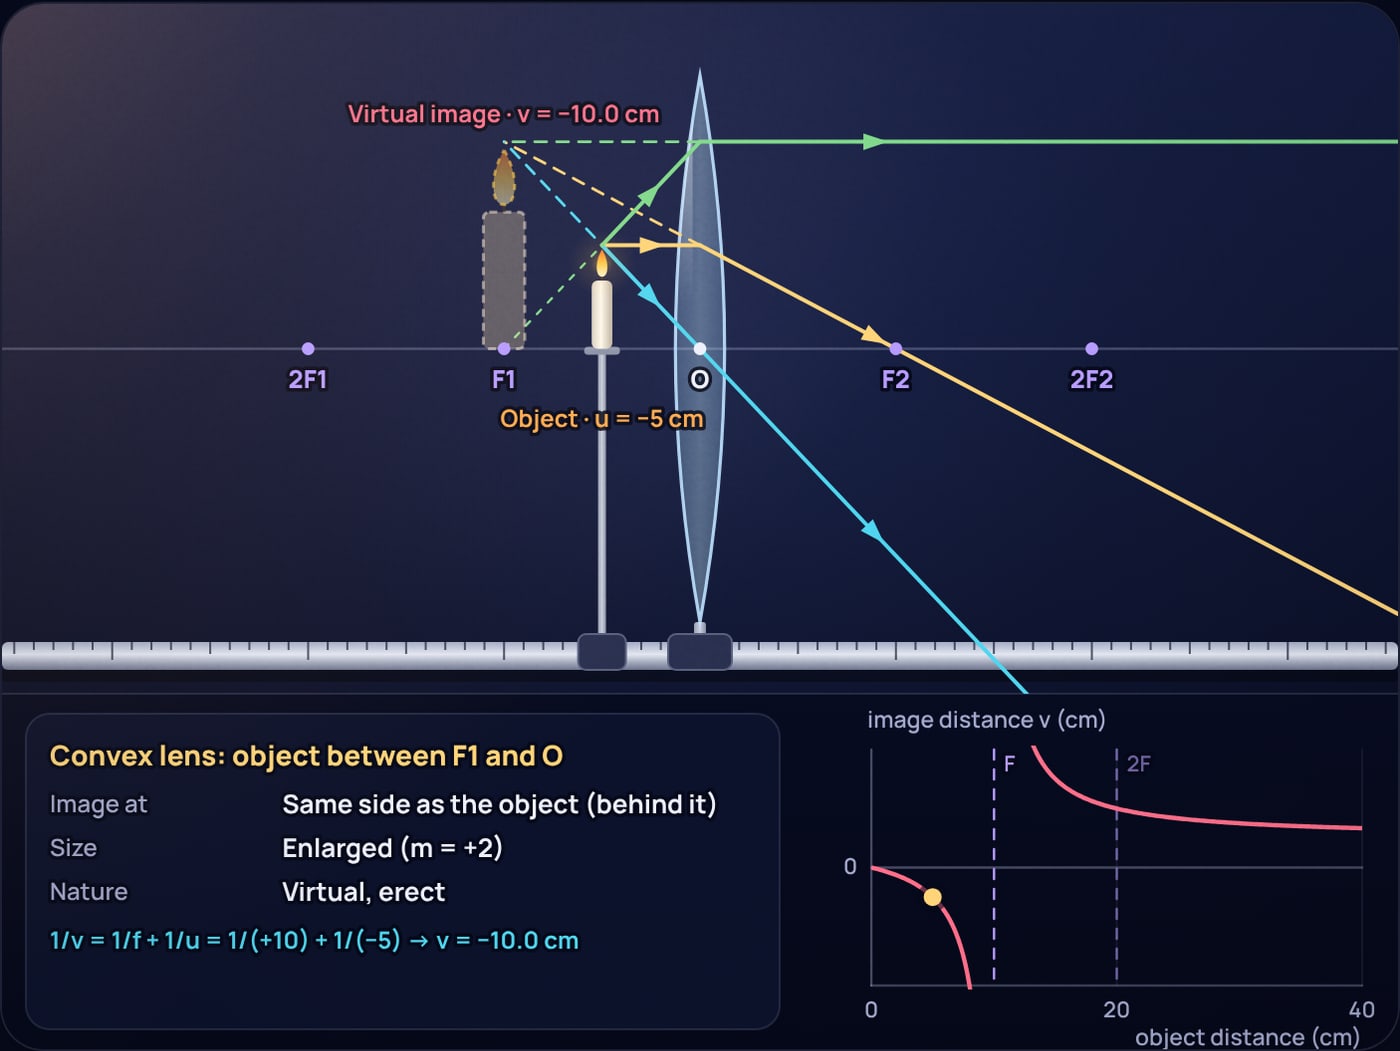
In an exam answer the dashed lines are not optional. They are the only thing that shows where a virtual image is, and examiners look for them.
All six cases in one table
| Object position | u (cm) | v (cm) | m | Image position | Size | Nature |
|---|---|---|---|---|---|---|
| At infinity | −∞ | +10 | about 0 | At F2 | Point-sized | Real, inverted |
| Beyond 2F1 | −30 | +15 | −0.5 | Between F2 and 2F2 | Diminished | Real, inverted |
| At 2F1 | −20 | +20 | −1 | At 2F2 | Same size | Real, inverted |
| Between F1 and 2F1 | −15 | +30 | −2 | Beyond 2F2 | Enlarged | Real, inverted |
| At F1 | −10 | ∞ | ∞ | At infinity | Highly enlarged | Real, inverted |
| Between F1 and O | −5 | −10 | +2 | Same side as object | Enlarged | Virtual, erect |
Two patterns make the table easy to rebuild from scratch. First, as the object moves in from infinity toward F1, the real image moves out from F2 toward infinity and grows all the way. Second, F1 is the dividing line: outside it, real and inverted; inside it, virtual and erect.
How is a concave lens different?
A concave lens spreads light out, so its focal length is negative. Rays from the object leave it diverging whatever you do, and the image is always virtual, erect and smaller, between F1 and O. For a 10 cm concave lens (f = −10 cm) and an object at 20 cm, 1/v = −1/10 − 1/20 = −3/20, so v = −6.7 cm and m = +0.33.
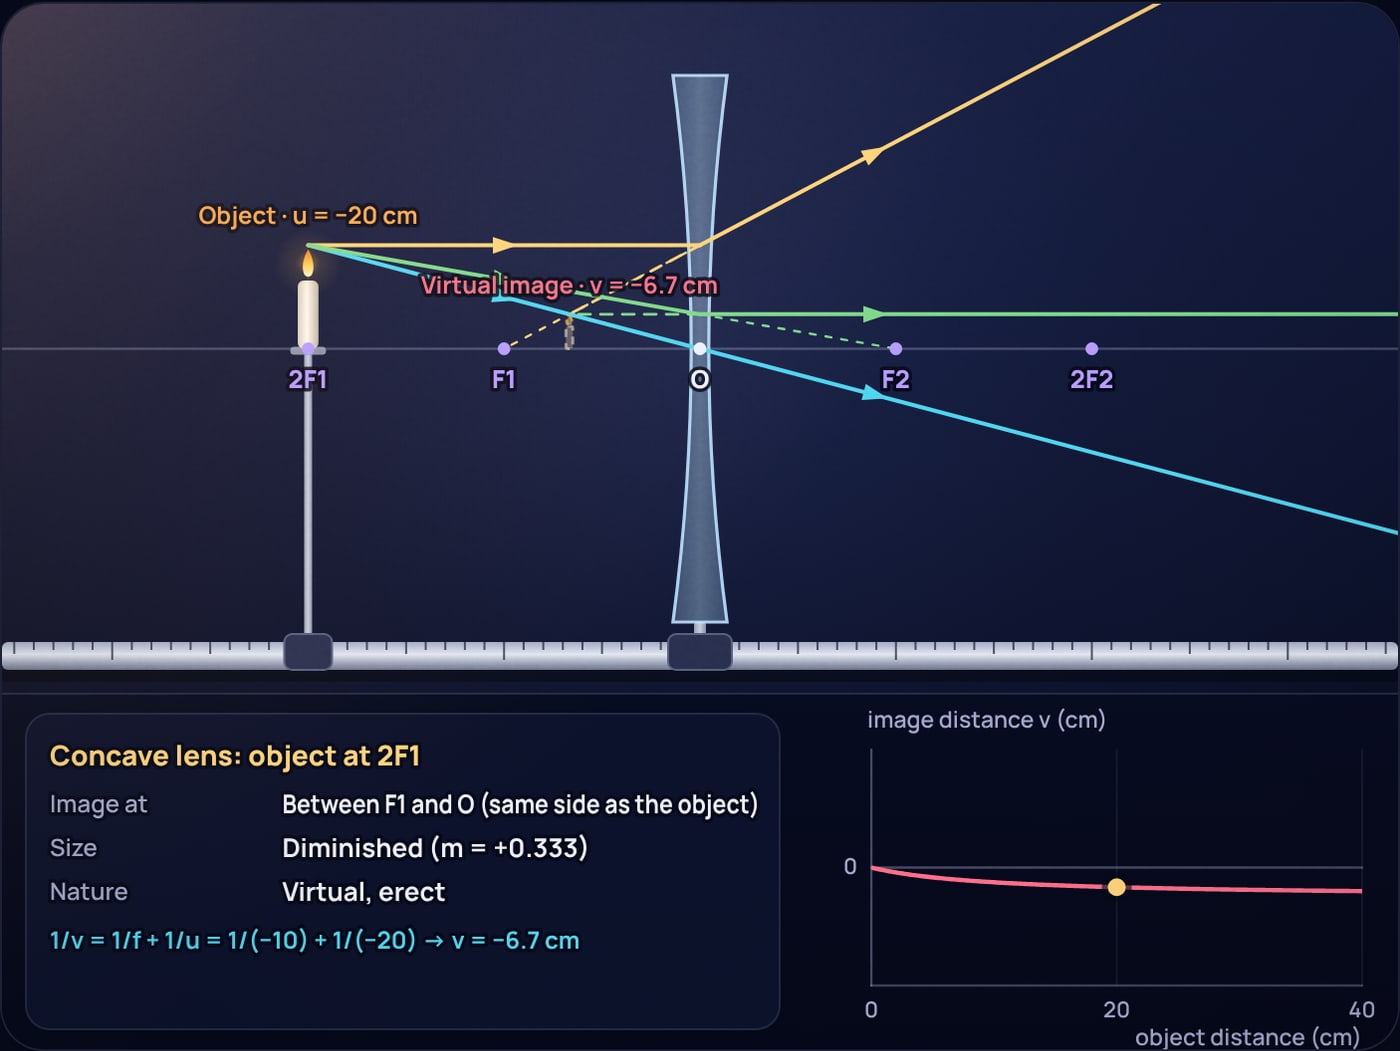
That is why short-sighted people wear concave lenses: the lens makes distant objects appear at a nearer virtual position that the eye can focus on. Their prescriptions are in negative dioptres, because power is P = 1/f with f in metres, so a lens of f = −50 cm is −2 D.
The misconception: half a lens gives half an image
Cover the top half of a convex lens with black paper and many students expect the top half of the image to vanish. It does not. Every point of the lens receives light from every point of the object, so the uncovered half still carries all the rays needed to form the whole image. You get the complete candle, just dimmer. In the simulator, the parallel ray and the central ray already cross at the image without using the lower half of the lens at all.
A second one worth fixing: "the image distance is always positive". It is positive only for real images formed by a lens. Virtual images from a lens and real images from a mirror both have negative v in the NCERT convention, because they lie on the side the light came from. Mirrors use 1/v + 1/u = 1/f and m = −v/u; the simulator has concave and convex mirrors too if you want to compare the tables side by side.
Try it yourself
The fastest way to fix the table in memory is to drag the candle slowly from far left toward the lens and watch the image grow, run away to infinity at F1 and then jump to the other side as a dashed virtual image. Start with the projector case at 15 cm, then switch the lens to concave and see how the image never escapes the region between F1 and O. The "Save diagram" button downloads the current ray diagram as a PNG for your notes.
For more on how light bends, read why a rainbow always sits at 42 degrees, why the Moon looks huge near the horizon (a trick of the brain, not the optics), and our guide to buying a telescope in India, where the objective lens is case 1 in action.
Sources
- Teachoo, NCERT Class 10 Science, convex lens ray diagrams and the six-case table: teachoo.com/10838/3118/Convex-Lens---Ray-diagram
- Teachoo, NCERT Example 10.4 (2.0 cm object, 15 cm from a lens of focal length 10 cm): teachoo.com/10804/3121/Example-10.4
- Vedantu, CBSE Class 10 revision notes on Light: Reflection and Refraction (sign convention, lens and mirror formulas, power and dioptre, concave lens cases): vedantu.com/revision-notes/cbse-class-10-science-notes-chapter-9
- OpenStax College Physics, section 25.6, Image Formation by Lenses (thin lens equation in the real-is-positive convention, power in dioptres): phys.libretexts.org, College Physics 25.6
- The Physics Factbook, "Focal Length of a Human Eye" (about 17 mm, roughly 60 dioptres): hypertextbook.com/facts/2002/JuliaKhutoretskaya.shtml
Frequently asked questions
What are the six positions of an object in front of a convex lens?
At infinity, beyond 2F1, at 2F1, between F1 and 2F1, at F1, and between F1 and the optical centre O. The first five give a real, inverted image on the far side of the lens. Only the last gives a virtual, erect, enlarged image on the same side as the object.
Where should the object be placed to get a real image of the same size?
At 2F1, twice the focal length from the lens. The image forms at 2F2 on the other side, real, inverted and the same size. For a lens of focal length 10 cm the object goes at 20 cm and the image appears at 20 cm, with magnification -1.
Why is magnification negative for a real image formed by a convex lens?
In the New Cartesian sign convention, m = v/u. For a real image v is positive (far side of the lens) and u is always negative (object on the left), so m is negative. The negative sign means the image is inverted, below the principal axis.
Can a convex lens form a virtual image?
Yes, when the object is closer to the lens than its focal length, between F1 and O. The rays leave the lens diverging and only their backward extensions meet, on the object’s side. The image is virtual, erect and enlarged, which is how a magnifying glass works.
Which two rays are easiest to draw in a convex lens ray diagram?
The ray parallel to the principal axis, which passes through F2 after refraction, and the ray through the optical centre, which goes straight on. Two rays are enough to fix the image. The third ray, through F1 and out parallel, is a useful check.
 50 Hilarious Physics Jokes That Will Make You Laugh
 Could Ant-Man Really Shrink? The Physics Says No